Directive Blogs
The Definitive Guide for Getting Your Passwords In Order, Once and for All

Normally, we try to keep the focus on business technology, but this guide is geared toward the typical home user, who may not be that high-tech.
These days, nearly all human beings are wrapped up in a little technology, and there isn’t a huge divide between protecting yourself as an employee at a company versus protecting yourself as an individual—at least as far as cybersecurity habits go. Even if you feel like you are pretty low-tech, you still have to worry about protecting your identity, financial information, and personally identifiable information online.
We encourage you to share this guide with everyone you can, from students to those enjoying their retirement. We all have family or friends who have a loose ream of paper they scrawl their passwords onto, or might even have worse habits that they think are perfectly healthy that are putting them at risk. This guide might help them reduce the risk of expensive, frustrating problems.
If you were sent this guide, greetings! There is someone who cares about your safety online and wants to try to make your digital life a little easier. We hope you find this guide useful, and we’d love to get feedback from you if you have any!
Why Strong Passwords and Strong Cybersecurity are Important
Protecting your personal information is extremely important. It doesn’t matter how little or how much you use a computer, tablet, or smartphone; if you use the Internet at all, you need to protect yourself.
We’re not using this guide to sell you anything (although we will mention tools and services that have paid tiers). Our goal for this guide is to spread awareness and help people in and around our community build stronger defenses against the growing number of online threats.
We talk a lot about cybersecurity in the rest of our blog; if you find this guide helpful, you can certainly check out more articles.
It’s Easier Than Ever to Lose Track of Your Data
The Internet was built to be a network of ideas, information, and commerce. Over the last several decades, individuals, organizations, and businesses have come up with a lot of really amazing ways to make the Internet more useful, more profitable, and more critical to our daily lives. Things that used to be reserved for only some of the most technologically-abled users are now normal things that the average person doesn’t think about.
For instance, storing photos on the Internet.
Back in the early days, before social media and other services existed to let you upload thousands of family photos to store and share, it was relatively complex to roll out hosting to archive and share photos. Today, it’s likely your smartphone is simply doing that for you without you even realizing it.
If you use Apple’s iCloud service or Google Photos, there’s a chance that photos you take with your smartphone simply get backed up to an online account. In some cases, it’s the default setting on your device. Every picture you take gets uploaded to the cloud. It’s hidden behind a login that you control, but still—that’s a big paradigm shift over the last few decades that we all just need to understand.
The term “the cloud” is pretty vague, but essentially it’s just someone else’s computer. In this case, it’s a computer that Apple or Google control. You are relying on Apple and Google to be secure and trusting that they will be ethical with your photos. Generally, these services are fine to use, but if you aren’t taking steps to make sure your accounts are secure, you are opening yourself to additional risks.
If you shook your head while reading the two paragraphs above and said “Well, I don’t use those services,” you might want to double-check, because iCloud is built into every iPhone and Google Photos is preinstalled on most Android devices.
We’re not saying you can’t trust Google or Apple, the point is that it’s just so easy to be unaware of where your data is actually going.
It’s not just photos either.
Most businesses that you work with store information online. Your dentist might allow you to log in to see your dental history or pay your invoices, your trash collector has an account for you to make payments, and your Amazon account knows what types of products you look at, as well as the music and movies you like to watch.
We’re oversimplifying it, but the modern world runs on information, and that information is valuable, especially in bulk.
You (And Your Data) Are the Product
Let’s briefly look at Facebook.
When Facebook (back then it was called TheFacebook) launched, it was a closed-off network of select college and university students that could connect based on the classes they took. They could upload a photo, talk to classmates, and join groups based on the classes they were in.
(We’re grossly skimming over some history here to get to our point.)
A few years later, Facebook opened up to the general public, and quickly exploded in popularity. It didn’t take long before millions of people were sharing information about themselves, uploading photos, and communicating on what would soon become one of the largest, most influential social networks.
The world really hadn’t seen something like this before—a singular platform for hundreds of millions (now it’s 3 billion, or over a third of all humans) to communicate and connect.
To develop, maintain, and host this kind of platform, Facebook needed money. Back in 2012, Facebook’s operating cost was about $1 per user per month. They had around 800 million users at the time, so that’s roughly $800 million dollars per month just to run the site, let alone costs for future development, new products, new features, etc.
They don’t charge users to use Facebook—that would defeat the purpose of the platform. Instead, YOU are the product. Facebook’s revenue is based on ads. Facebook makes money off of ads because the people on Facebook produce content that encourages other people to continue to use Facebook. In return, you and I can use Facebook for free.
This is relatively reasonable in the modern world, and something that most of us can more-or-less ignore. However, it brings up just how valuable an individual’s data actually is.
Your activity on Facebook helps Facebook maintain itself and even profit. Granted, Facebook doesn’t have a flawless track record of how they handle your information, who they sell it to, and how people take advantage of the system, but it’s a perfect example of just how valuable your participation and information is.
Even a Little Data Tells a Big Story
Let’s use Netflix as an example. What does Netflix know about you?
They likely have your name and contact information, your credit card information, your email address, as well as the types of devices you use Netflix on. They also keep track of the movies and shows you watch so they can better serve you and make decisions about how to adjust their services.
It’s easy to dismiss this as the cost of doing business. Sure, Netflix needs to know who I am to bill me, and obviously they can track the shows I watch.
But what if someone else were to get that information?
Well, your contact information is one thing. If the wrong entities get hold of that, you could start getting a lot more spam. They know you are a Netflix user, so they could pretend to be Netflix or pretend to be affiliated with Netflix to try to trick you into something. It’s pretty easy to look through the list of devices that someone watches Netflix on to determine their tax bracket, and look at the content they watch to determine their gender, cultural values, marital status, and even get an idea of when you are home or not. On top of that, there’s credit card information.
That’s a lot of information, and that’s just Netflix! Email providers, cellphone carriers, Internet service providers, banks, and social media sites store even more information about you.
You aren’t going to change this paradigm. You are a part of this digitized future, and it’s important that you acknowledge it and follow the steps in this guide to protect your information.
What’s the Big Deal? Why Would Someone Want MY Data?
This is a pretty common question. In fact, almost every single time we help someone who has been targeted by cybercriminals, this question comes up.
It’s rarely personal. It’s rarely because you were some kind of target that stood out.
Cybercriminals don’t care about you as an individual; it’s a numbers game. It’s like any sort of marketing or advertising campaign—they target thousands or millions of people with the expectation that they will get a certain return on their efforts.
If a criminal were to create malware that infects one million PCs, with the purpose of stealing bank account information, they might know that it would only steal bank account information for a small percentage of those users. If they instead try to infect 100 million PCs, there’s a better chance they will steal more bank account information.
But they don’t even need bank account information to consider the heist a success.
Remember our Netflix example above? If they were to break into Netflix’s network and steal that information from a million accounts, each one of those accounts would be worth a little money on the black market. This happens all the time, as big organizations suffer from data breaches and all of that information gets dumped on the dark web for other criminals to peruse, steal, and sell.
Maybe Netflix data isn’t the gold mine, but cybercriminals do know that most users have one particularly bad habit that makes them especially vulnerable…
Some of those passwords stolen from Netflix are likely going to work on other accounts for that user, because most people are notoriously bad at using unique passwords between accounts.
For a large percentage of users, if I have your Netflix password (or some other password from a different account), I can likely get into your email, bank, or some other much more valuable account.
These big organizations get breached all the time, and often take months before they even realize it or tell their subscribers about it.
Want to see how many times your email address has been found in massive data breaches? There’s a great site for checking: https://haveibeenpwned.com/
Fortunately, what we go over throughout the rest of this guide is going to protect you from this.
Thanks for listening to us so far—cybersecurity is something we are passionate about and we just want to help you understand why it’s so important. Let’s get on to the guide so you can protect yourself online!
How to Get Your Passwords In Order, Once and For All
In this guide, we’re going to cover several steps in order to gain control over your passwords. We’re going to discuss a few ways to make strong passwords that are easier to remember, but ultimately, you are going to rely on a secure password manager to remember most of your passwords for you.
This process is going to take you some time, but once it’s done, it takes very little effort to maintain.
Here are the steps we’re going to take:
- Create Two Strong Passwords
- Choose a Primary Email
- Secure Your Primary Email Account
- Set Up a Multi-Factor Authentication App
- Set Up Multi-Factor Authentication on Your Primary Email
- Set Up a Password Manager
- Update every account, secure it, and log it into the password manager
- Delete old passwords stored in your browser (or in Word documents, spreadsheets, sticky notes, or anywhere else)
- Maintain Good Password Habits
1) Create Two Strong Passwords
A strong password includes the following: capital letters, lowercase letters, numbers, and symbols.
The length of the password is also important, as shorter passwords are easier for hackers to crack. With the right tools, a criminal can crack an 8-character password in just a few minutes. A good goal is 16-24 characters (although some sites or accounts might limit you to 12-16 characters, so always try to use the maximum possible).
You might say, “Wow, that’s a long password,” and you are absolutely right! It’s hard to memorize and recite a complex password like that, but the good news is that you’ll only need to memorize one or two of them (we’ll get there in a moment).
Ultimately, we want you to use this exercise to build two extremely strong master passwords, and you’ll need to recall these passwords in order to bring up all of your other passwords.
The easiest way to make a password that is both easy to remember and secure is to use passphrases. A passphrase is a string of random words that wouldn’t normally go together, and don’t really have anything to do with you personally. Avoid pet names, family members, phone numbers, zip codes, birthdates, and other personally identifiable information.
Here’s an example:
Radar Downtown Panda Burrito Oreo
These five words contain 29 characters if we string them together. If we adjust the capitalization to make it a little more complex, add a few numbers and symbols, we get an extremely secure password that is relatively easy to memorize:
2RADAR@downtown38PANDA!burrito#ORE0
Obviously you can’t use this example, as it’s posted on the Internet, which immediately makes it easy for criminals to crack.
If you aren’t feeling particularly creative, you can use this random word generator to spit out some ideas for you.
You can also create strong passwords that are very secure with this catchy trick.
Make yourself two passwords using one of these methods, and commit them to memory. For now, you can jot them down on a piece of paper (but keep that paper safe and secure). Ultimately, you are going to get good at typing them in, so you don’t need to reference them.
2) Choose a Primary Email
All of your online accounts are either connected to an email account, or less frequently, a phone number. If you somehow lost your password or needed to prove that you are who you say you are, the service will authenticate you by sending you an email (or in some cases, a text message).
Most adults have multiple email addresses. You might have email accounts for work, you might have an email account you received when attending college, or one provided to you from your Internet Service Provider. You may also have Gmail, Yahoo, Hotmail, Outlook, or other types of email accounts.
We suggest that for most of your online accounts, you choose one single email account to manage everything (with the exception of work-related logins and accounts, those should always be through your work email). Everything that is personal to you, that you want to have access to and own the rights to indefinitely should all be tied back to one single email inbox that you can trust to remain functional for the rest of your life.
A Google Gmail account is a good option for this if you already have one. I’d avoid using email accounts from your ISP, your place of work, or other organizations you are a part of. Again, we’re trying to avoid having to put a lot of time and effort into maintaining your digital identity in the future. We’d also suggest avoiding Yahoo accounts, as historically, Yahoo has had major issues involving every single email account being compromised.
For this example, we’ll use a Gmail account as our primary email.
We’re not suggesting that you go out and create a new email account either—we’re going to use the one you already have and make sure it’s secure.
This means that any time you sign up for a new service or create an online account somewhere, you will use the same email address. When you log into an older account and notice it’s tied to a different email, you adjust it. We’re going to have a step where we do this for all of your accounts shortly, so bear this in mind.
3) Update Your Primary Email Password
Your primary email needs to be extremely secure. If a criminal were to gain access to your primary email, they’d be able to reset passwords for all of your online accounts. This email needs to be your Fort Knox.
The first thing you need to do is update the password on your primary email. Use the first password you created in step 1. This is your new email password for that account.
For Gmail, you do this by going to your Google Account Settings, click Security, and go to Password.
For Outlook/Hotmail accounts, you can typically update your password here.
For Apple mail accounts, go to your Apple Account Settings. In the Sign-In and Security area, choose Password.
4) Set Up an Authentication App
It’s referred to as Multi-Factor Authentication (MFA) or 2-Factor Authentication (2FA). They are essentially the same thing, and you’ve probably run into accounts that require this. When you log into an account, you get an email or a text message with a six or eight-digit PIN number that is required for you to finish the login process.
This adds a huge layer of security to your accounts because not only does someone need to know your password to get into something, they need to have access to your phone or email.
The most iron-clad way to set this up is to use an authenticator app that installs on your phone, and can easily be carried over to new phones when you upgrade.
An authenticator app will prompt you to scan a QR code to enter the account into the authentication app. Once done, the account will display a 6-digit PIN that refreshes every 30 seconds. You’ll use that as your authentication PIN for the account moving forward.
Let’s take a look at some of the most popular authentication apps:
Google Authenticator is a good choice for this if you are already using Google’s ecosystem (for instance, if you use Gmail for your primary email). As long as you take good care of that Google account, moving from one device to another is seamless and ensures you’ll always have access to your authentication codes.
Install Google Authenticator for Android here
Install Google Authenticator for iOS here
Microsoft Authenticator is good too, but you will be required to manually backup the app and restore it when you get a new device.
Install Microsoft Authenticator for Android here
Install Microsoft Authenticator for iOS here
Apple Passkeys and Apple Keychain are Apple’s take on authenticator apps. If you are in Apple’s ecosystem as opposed to Google, this might be a good option, but not all logins will support Passkeys, so you’ll need Keychain for traditional MFA accounts. Both Passkey and Keychain are built into iOS, and neither have official Android versions.
DUO Authenticator is a popular third-party authenticator, and like Microsoft, you can manually back it up to the cloud and restore it to a new device. DUO is a particularly good option for businesses as it allows for push notifications and can be centrally managed.
Install DUO Mobile for Android here
Install DUO Mobile for iOS here
In summary, If you are using Google in general and have a Gmail account, Google Authenticator is the way to go for your personal life. Keep in mind that your company might have an official solution to use for work-related accounts. Just make sure you are signed into your Google account when using it so it backs up to your account.
Why Don’t We Just Use Text Messages for Multi-Factor Authentication?
Some accounts will let you use SMS text messages for authentication, and while this is better than nothing, it’s a little less secure. There have been plenty of cases where cybercriminals have been able to infiltrate and intercept these text messages to weasel their way into user accounts.
Installing Google Authenticator
Google Authenticator is typically the best choice for most home users, but the other apps can be set up in roughly the same way. Let’s dive into the details on how to use Google Authenticator.
Your authenticator app installs on your smartphone. The idea is that most people carry around their smartphones and always have them on hand, so an easy way to add a secondary verification method to prove you are who you say you are is to prove that you have your smartphone with you.
With multi-factor authentication set up on your accounts, you’ll need to have your smartphone with you to log in, but ultimately this adds a huge layer of security. You can also install your authenticator app on Android and Apple tablets, but make sure it’s on your smartphone first and foremost.
Installing Google Authenticator on Apple Devices
If you have an iPhone, simply navigate to the Apple App store and search for “Google Authenticator” or click here to go directly to the Google Authenticator app on the App Store.
Install the app on your device. Once installed, launch the app and log in with your Google account.
Installing Google Authenticator on Android Devices
If you have an Android phone, simply navigate to the Google Play store and search for “Google Authenticator” or click here to go directly to the Google Authenticator app on the Play Store.
Install the app on your device. Once installed, launch the app and log in with your Google account.
5) Set Up MFA for Your Primary Email
Now that you have an authenticator app, you need to start using it!
Start with your primary email account that we established earlier. This is your main email account that you will associate with almost all of your other accounts, so it needs the highest level of security. It won’t prompt you for your MFA code every time you check your email, but it will ask whenever you try to sign into a new device or log out and log back in.
You can typically set up Multi-Factor Authentication in the security settings of any account, but the exact way to find it will depend on the service. Here are a few of the popular ones:
Setting up MFA for Gmail/Google
For Google/Gmail, go to your Account page and go to Security > 2-Step Verification and follow the prompts to set it up in your Authenticator app. It will provide you with a QR code to scan.
In the Google Authenticator app on your phone, click the + icon and select Scan a QR Code.
Then, scan the QR code. This will generate a 6-digit PIN you can use to authenticate.
Setting up MFA for Microsoft/Outlook/Hotmail
For your Hotmail or Outlook account, log into your email and click the gear icon. Then go to Options > Account Details, then go to Security & Privacy > More Security Settings, and scroll down to Set up two-step verification. Then follow the prompts to set it up in your Authenticator app.
In the Google Authenticator app on your phone, click the + icon and select Scan a QR Code.
Then, scan the QR code. This will generate a 6-digit PIN you can use to authenticate.
Setting up MFA for Apple
You can manage your Apple account by signing in to the Manage Your Apple Account page. Then go to Account Security > Two-Factor Authentication and click Get Started…Follow the prompts to set it up in your Authentication app.
In the Google Authenticator app on your phone, click the + icon and select Scan a QR Code.
Then, scan the QR code. This will generate a 6-digit PIN you can use to authenticate.
Setting up MFA for Other Emails
Most emails and online accounts have settings to enable multi-factor or two-factor authentication. Typically these are in areas in the settings labeled account, security, privacy, or something similar to that.
In the Google Authenticator app on your phone, click the + icon and select Scan a QR Code.
Then, scan the QR code. This will generate a 6-digit PIN you can use to authenticate.
6) Set Up a Password Manager
Please note that we are assuming that you are using a desktop PC, laptop, or Mac for this. You can set everything up from a mobile device as well, but these instructions specifically walk you through using a computer.
A good password manager will make the rest of this process a whole lot easier, and will be your best friend when it comes to getting you into your accounts.
If your employer provides you with access to a password manager, there’s a chance that you are also able to get a personal or family account through your employer for free. Not every password manager offers this, but several do as a perk. Most password managers are a few dollars a month for premium services—it’s not much, but if you can save $30-$50 a year because you get a free personal subscription from work, go for it! However, you DO NOT want to use your work account to store personal passwords! Keep them separated!
At Directive, we trust and recommend Keeper Password Manager. It’s easy to use, secure, and works on nearly every platform, including Windows, Mac, Linux, Android, and iOS.
While there isn’t a free version, you can try a free trial, and there are family plans, business plans, as well as special pricing for students, military, and medical users. If your company uses Keeper, you can get a free personal account.
Learn more at https://www.keepersecurity.com/
If you represent a business and need help setting up Keeper, we can certainly help—just give us a call at 607-433-2200.
Creating a Keeper Account
For your personal account, setting Keeper up is pretty straightforward.
Go to https://keepersecurity.com/vault/ and click Create an Account.
NOTE: If someone has a Keeper family plan and is sharing it with you, check your email for instructions on how to set up the account into the family plan.
Use your primary email address to make the account, and use the second password you created in step 1 (don’t use the same password you used for your email account, it has to be unique!).
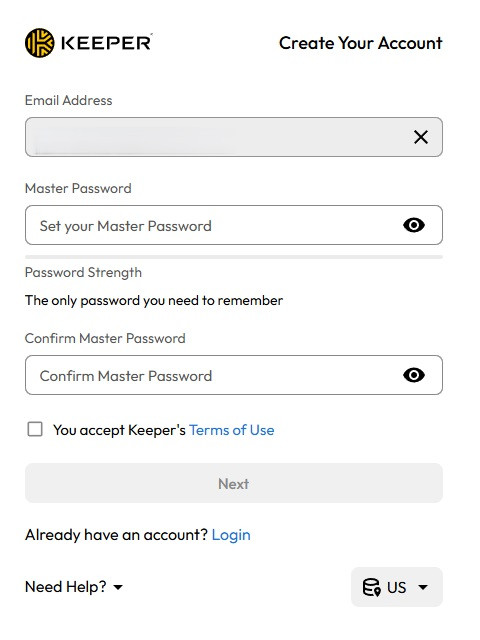
This is the password you’ll need to memorize, but it’s also the password that rules over all of your other passwords, so complexity is extremely important. Use our suggested method from step one, where you string several random words together, and then utilize capital letters, numbers, and symbols.
Keeper will then send you an email with a verification code. Check your email and enter in the code to validate your email.
If you are creating a new Keeper account, this will activate your 30-day free trial. If a friend or family member is sharing a family plan with you, this will activate your account.
Securing Your Keeper Account
Now that you are logged into Keeper, at any point you can click the Rocket Ship icon near the top right to activate their onboarding tool. This will give you options to install the Keeper Browser Extension and Set Up Account Recovery.

Let’s start with Set Up Account Recovery.
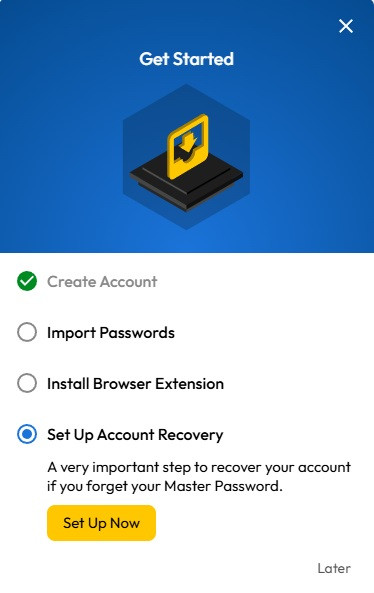
Click the Rocket Ship at the top of Keeper’s Vault and a popup tool will appear (shown above). Choose Set Up Account Recovery and then click Set Up Now.
Keeper will ask you to Set up Account Recovery, starting with a Recovery Phrase. You can use this to recover your Keeper account in the event that you forget your Master Password. Click Generate Recovery Phrase.
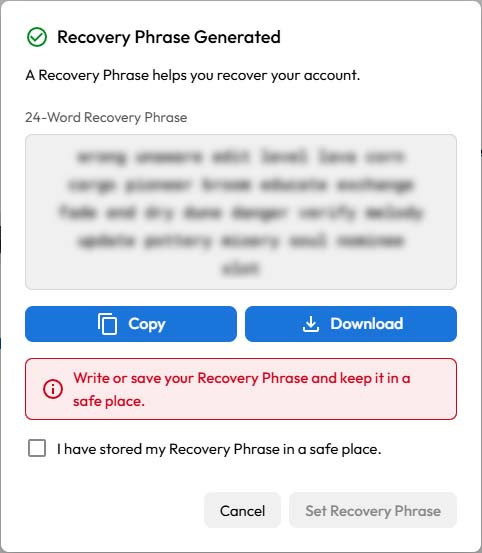
Keeper will generate a 24-word phrase. Copy this down and store it in a safe, secure location.
Once you’ve confirmed you have stored your Recovery Phrase in a safe place, click Set Recovery Phrase.
Now, we’re going to set up multi-factor authentication for your Keeper account.
Click on your email address in the top-right corner and go to Settings. Then click Security.

On this screen, toggle Two-Factor Authentication on.
Keeper will ask you what authentication method you want to use. Choose Authenticator App and click Next.
You’ll be given a QR Code. Open your authentication app (we suggested Google Authenticator earlier in this guide) on your mobile device and click the + icon, and then Scan QR Code. Scan the QR code and enter in the six-digit verification code into Keeper to validate. Then click Next to finish the process.
Install Keeper on Your Web Browser
To make your life a whole lot easier, you’ll want to install Keeper as a browser extension so it can automatically sign you into accounts and remember new passwords for you.
Click the Rocket Onboarding Icon again. This will pop up the Get Started window again. Click Install Browser Extension and then click Install Now.
Keeper will detect your browser and take you to the appropriate site to install the browser extension. If you are using Google Chrome, click Add to Chrome. The other supported browsers will have similar methods to install Keeper.
Install Keeper on Your Mobile Device
Finally, you are going to install Keeper on your smartphone. You can also install it on your Android or Apple tablets in this way, but having quick access to your passwords from your mobile device will become very handy.
On your smartphone, navigate to the Google Play Store or Apple App Store and search for Keeper Password Manager. You can also use these links to navigate and install it:
Keeper Password Manager on the Google Play Store for Android
Keepers Password Manager on the Apple App Store for iOS
You can install them and then log in with your email and master password. If your mobile device is set up to use biometrics (thumbprint scanning, retina scanning, etc.) you can enable that in Keeper to make logging in even easier and more secure.
Keeper on Your Desktop
You can also install a Keeper application on your desktop. You can get it here.
7) Update Every Account, Secure It, and Log It Into Keeper
This is THE big step.
We recommend you grab a snack and a drink, because depending on how many accounts you have, this can take a while. Pace yourself and take your time—it’s better to be thorough.
You are going to learn something about yourself with this task—I certainly did. I learned that I had well over 300 different logins, and you’ll likely discover that you had more than you thought you did, too.
It was a nightmare, but it was absolutely worth it.
You are going to log into every single account you have, generate a new, super-secure password, and document it into Keeper.
There’s a light at the end of the tunnel, though…
Once you have everything properly documented and logged in your password manager, keeping things maintained and organized is infinitely easier. You’ll never have to do this again if you take your time and commit to it.
Here’s What You Are Going to Do For Every Single Account You Have
- Log into the account.
- Find the account settings/security settings area for that website or account, and confirm that the account is set to your primary email.
- Update any and all information under the account (add in a phone number if they offer SMS authentication, check to make sure your address is up-to-date, etc.)
- Log the account into Keeper—put in the URL of the account, the username/email used, and generate a new, complex password using the built-in password generator.
- Update the password for the account with the new one, and follow any steps required to authenticate the change (some accounts might send you a link or code to your email to verify).
- Look for options to enable and set up multifactor authentication, 2-factor authentication, MFA, or 2FA. Follow the steps to enable it and set it up in your authentication app.
- Save the password record in your password manager and move on to the next account to repeat the steps.
Ensure that Every Password is Unique
Keeper will warn you if you are using weak passwords, so as long as you use their password generator tool to create a unique, complex password for each account, you should be golden.
You should rarely have to type in these passwords by hand, as you can install your password manager onto just about any device, so be sure to generate long, healthy, complex passwords. We recommend 16-24 characters with capital letters, lowercase letters, numbers, and symbols.
This is going to get repetitive, but every single website and every single account will be slightly different. You’ll need to take your time to figure out how to update your password for each account. Sometimes that might require you getting verification emails or text messages, sometimes you might have to reset passwords just to get into an account if you forgot your password… take your time with this, because if you do it properly, you’ll likely never have to fumble around with this again.
EXAMPLE: Let’s Go Through the Process for Facebook:
- Log into your Facebook account.
- If you have to enter in a username and password to get into Facebook, Keeper might prompt you to store your username and password. Go ahead and let it. If you are already logged into Facebook it might not.
- Click on your profile image on the top right and go to Settings & Privacy > Settings.
- Click Security and Login.
- Under the Login section, click Change Password.
- In most cases, if Keeper detects you trying to create a password or change it, it will offer to help you.
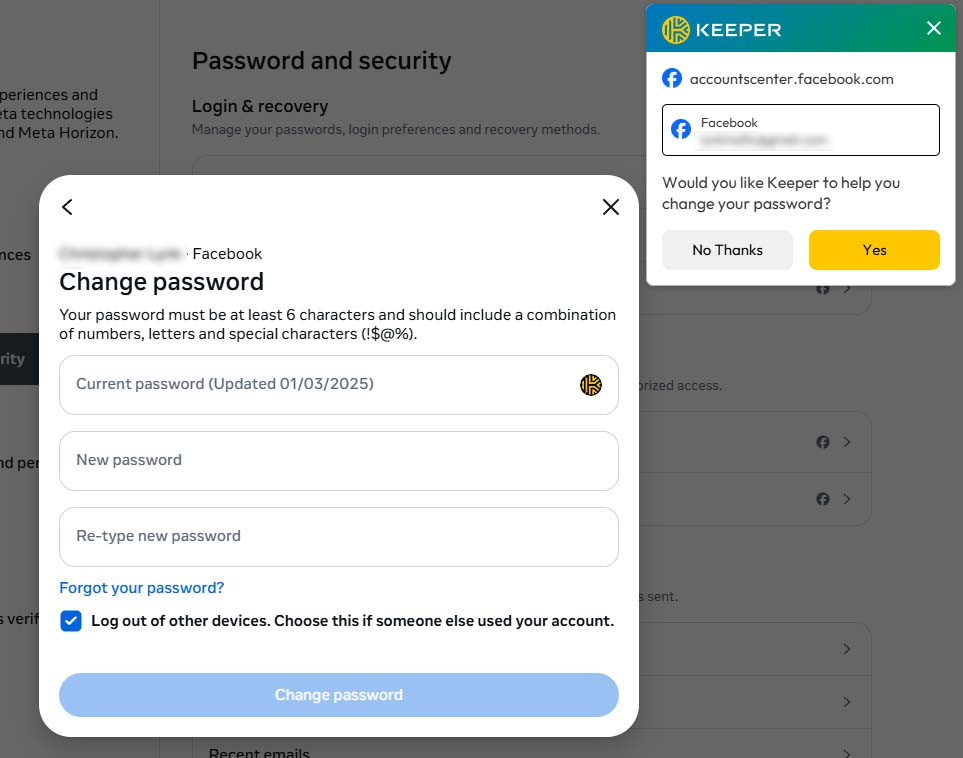
- Click Yes to have Keeper assist you with changing or generating a new password.
- Follow the On-screen instructions. If Keeper already knows your current Facebook password, it will have you click on the Current Password field and populate it for you. Keeper will then have you click on the other fields and generate a secure password. Follow the steps carefully and Keeper will save the password, and then click Change Password on Facebook to finish the process. If you run into issues with this, please see the notes below labeled “Some Sites Need to Be Manually Updated.”
- Since we’re here, let’s also secure the account with MFA. For Facebook, go back to Password and Security and click on Two-factor authentication. Follow the on-screen steps to generate a QR code for your authenticator.
- Open up Google Authenticator on your mobile device, tap the + icon and select Scan QR Code and scan the QR code. Finish by typing the new six-digit key into Facebook.
Now do this for every single additional account you have!
Some Sites Need to Be Manually Updated
Note that not all websites are built in a way that Keeper recognizes them, so you may have to generate the new password by right-clicking on the new password field and selecting Keeper > Create New > Login.
This will open up a new tab and let you manually enter in your information and generate a password:
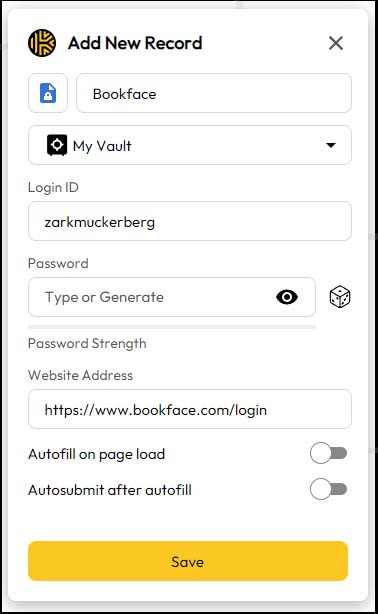
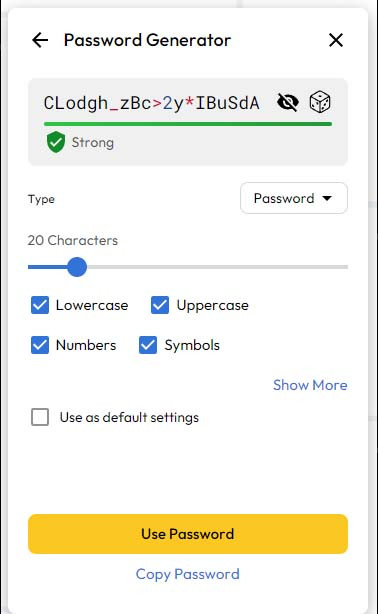
From here, click on the Dice icon next to Password to generate a random, secure password. It will give you some options in case the site ends up being picky about the number of characters or the types of characters you use. You should always strive to use an assortment of lowercase letters, capital letters, numbers, and symbols in the password, and the password should be at least 16-24 characters if possible.
After generating the password, you can click Use Password and it should populate into the password field. If it still doesn’t (again, this is a problem with sites that aren’t built properly), you can right-click on the password field on the website and go to Keeper > Log In (sitename) > Fill Password.
The important thing is that you generate the passwords and save them in Keeper first, and then make sure they get updated on each website.
You Can Cheat a Little with Streaming Services
Above, we had mentioned you’ll never need to type in a complex password by hand because you can install your password manager on virtually any device. There is an exception to this—your TV.
It’s a huge pain to try to type in a 24-character Netflix password just to watch The Great British Bake Off, so here’s a little exception to the rule that you can use specifically for streaming services to make the passwords a little easier to enter in.
Keep in mind, you still want these passwords to be unique, complex, and random… but maybe you want them to be a little easier to type into a television with a remote control. This also applies to guest Wi-Fi passwords and other accounts that you might need to read out loud or share manually.
Here’s a quick set of tips to make passwords that are easy to type or read out loud to a guest:
- Keep capital letters bunched together so you don’t need to tap the shift key over and over.
- Keep numbers and symbols bunched together for the same reason.
- Want to be super lazy? Use characters that are near each other on the keyboard.
- Avoid characters that look like numbers or other characters, like capital Is, lowercase Ls, the number 1, the number 0, and the letter o.
For example, if your Hulu password is something like this:
AAAQTXnuuyhu25548!#
(obviously don’t use this password, since it’s published on the Internet)
Note that the first third of the password is all caps, and all using letters on one side of the keyboard, while the second third is all lowercase using letters from the other side.
It’s much easier to type out with a television remote than something completely random, but this password still follows all of the critical rules that make it a long, complex password! It’s just easier to enter.
How to Find Websites and Services You Have Accounts For
Remember, your goal is to find each and every website, service, and account that you have a login for and get it documented and updated. That’s going to include the following:
- Bank accounts and credit card accounts
- Online payment accounts like PayPal, Venmo, and Zelle
- Online stores and marketplaces like Amazon, eBay, Etsy, and more
- Social networks like Facebook, X, LinkedIn, and Reddit
- Subscription services like news websites, Patreon, and others
- Entertainment sites like Netflix, Hulu, Disney, and others
- Services like TurboTax/Intuit, Microsoft, Adobe, your antivirus, and others
- Local, state, or nationwide accounts like IRS.gov, the DMV, and others
- Alternative email accounts
- Video game accounts like Steam, Nintendo, Sony, Microsoft, Epic, and others
- Website domain, hosting, and CMS logins (WordPress, Joomla, etc)
- Applications that you use that store information like Evernote, Microsoft, Notion, etc
- Home technology equipment like your router, smart home devices, guest networks, and more
It’s easy to forget just how many accounts you might have, so here are some tips for jogging your memory and finding them all:
- If you were storing passwords in your web browser, you might be able to find them there.
- For Google Chrome, click the 3-dot menu at the top right and go to Passwords and Autofill > Google Password Manager.
- For Microsoft Edge, click the 3-dot menu at the top right and go to Settings > Profiles > Passwords.
- For Firefox, click the hamburger menu at the top right and go to Passwords, or go to Settings > Privacy & Security > Logins and Passwords > Saved logins.
- Finally, for Safari, go to Settings/Preferences and click Passwords.
- Look at your bank account statements over the last year. If you get billed for any subscriptions, chances are you have an account to adjust.
- Go through your email. Look for terms like “account” or “welcome.”
8) Delete Old Passwords Stored in Your Browser (or in Word Documents, Spreadsheets, Sticky Notes, Notebooks, or Anywhere Else)
We hope that by now, with all of your passwords safely stored in a new password manager, you are feeling like you have control over your online security.
Now, you just need to tell your web browser to stop storing your passwords, since you only want your password manager doing that for you.
Why Shouldn’t We Trust Our Web Browser to Save Passwords?
While it’s a nice convenience to have your web browser log you into your accounts for you, there come some pretty hefty risks. It’s actually pretty easy for cybercriminals to hijack your browsing session with malware, which can give them access to passwords stored in the browser. With the password managers we suggested, it’s much more difficult as all of the data is encrypted and locked down.
Now that you have a password manager set up, you should remove any old information your web browser might have stored, and disable its ability to store passwords moving forward.
Removing Passwords from Google Chrome:
Open Google Chrome, click the 3-dot menu at the top right, and go to Passwords and Autofill > Google Password Manager. From there, click Settings.
Click the Delete data button next to Delete all Google Password Manager data.
Then click the toggle switch next to Offer to save passwords and passkeys so that it is turned off.
Removing Passwords from Microsoft Edge:
Open Microsoft Edge, click the 3-dot menu at the top right and go to Settings > Profiles > Passwords.
If you have passwords stored in Microsoft Edge, it will list them here. Delete them all.
From there, click Settings.
Make sure Offer to save passwords is set to off.
Removing Passwords from Mozilla Firefox:
Open Firefox, click the hamburger menu at the top right, and go to Passwords, or go to Settings > Privacy & Security > Logins and Passwords > Saved logins. There should be an option to Remove All Passwords.
Toggle Ask to Save Logins and Passwords for Websites to off.
Removing Passwords from Safari:
Open Safari, go to Preferences, and click Passwords. You can delete each password record individually. On a Mac, you can select all of the passwords and delete them all at once as well.
Now go to the Safari menu and go to Preferences, and select AutoFill. You can turn off all the AutoFill settings to prevent Safari from storing usernames, passwords, and credit card information.
9) Celebrate! You Did It! You Just Made Your Life Exponentially More Secure! Oh Yeah, and Maintain Good Password Habits
Congratulations! This wasn’t a small task, but we hope that you feel like it was worth it.
The only thing you need to worry about now is maintaining the course. Always make sure new passwords get put into your new password manager, and when you need to update a password, it gets logged away.
Keep your password manager extremely secure—every 6-12 months you should update the password to it, and audit the security of the account to make sure you always have access to your passwords. The password managers we suggested will all have tools and utilities that might warn you if something doesn’t seem right, or if you have an account with a weak password.
Just think… no more rustling through reams of paper or sticky notes to find passwords, no more hunting down login credentials! On top of that, you’ve made yourself much more secure and you’ve taken major efforts into cleaning up your cybersecurity hygiene.
Great work!
About the author
![]()